Showing posts with label tutorial. Show all posts

Monday, February 3, 2014

For Mind, Body & Soul - A Beginners Guide to Yoga


Happy Monday!

I just completed another Midday Yoga class at my school. I LOVE this class and had been looking forward to it since Wednesday. I have been taking this class for about two weeks and can already tell that it is improving my back and stress level. I'm more aware of my breathing, muscles and posture. Doing yoga midday relaxes and prepares me for the rest of the day. 

Here is a list of the top 10 reasons YOU should start doing yoga!

1. STRESS relief
2. Inner peace
3. Increased strength
4. Weight loss & waste management
5. Increased overall energy
6. Improved sleep
7. Heightened mental and intuitive awareness 
8. Improved hormonal balance
9. Brain synchronization & brain fitness
10. Whole body detoxification

What's not to love? Yoga is for your mind, body and soul. It is a health plan that focuses on 3 very important aspects of YOU.

Mind, Body & Soul


Anyone can DO yoga!


I think the most important part of the learning process for learning how to do yoga is to do it with someone else who has experience with the positions and breathing styles. It can be daunting and stressful when searching the internet, checking out books or watching videos. There is a lot of information to dig through!


Plus, who doesn't like wearing yoga pants?

And don't forget to eat well, drink plenty of water and get enough sleep.

Here are some helpful links to get you started:


Blessings, peace and joy this week,

Miss Maully


Friday, May 10, 2013

Miss DIY Momma {Boot Shaper}


Hello all you beautiful people!

Do you want to hear about how the Homemade Laundry Detergent worked?
Uh-Mazing! The soap did not sud very much but I could tell that the water that came out was DIRTY. The clothes smelled clean and felt clean. I just don;t know how to get rid of armpit smell. I couldn't even get it out with regular detergent! Jake's work is very labor intensive and he SWEATS

I love the detergent. I already did about 5 loads and you can't even tell that I dipped itno the detergent! For a scooper I use one of the Similac Formula scoopers. {They can be used for so many things! Country Time Lemonade anyone?}

The DEPOSIT IS DOWN! Now the exact apartment that we want is held for us until Rosie's birth certificate comes in! Then we can complete all the paperwork and apply! =)
I cannot wait to start decorating the apartment! The kitchen will have a sunflower/summer/spring feel and the bathroom will be seaside/nautical. Our bedroom will be bohemian and Rosie's room is Raspberry Jungle theme with pinks and whites. Wow that's all the rooms! And of course every room will be organized with cutesy containers and boxes. 

So...tomorrow is ROCKFEST!!! I am actually a little bit nervous and scared to be away from Rosie all day. It almost has me having second thoughts. But, I know that when I get there I will not have any doubts. Rockfest is the ONLY concert I go to every year and I have only missed ONE year since I started going.  I can LEGALLY drink this year and you best bet I am buying a few drinks! I just wish Disturbed was going to be there...
My super preggo friend is going too! She will be sitting the whole time though. I was pregnant last year by 3 months. 
It is so much fun and a great time. I always look forward to it and have a rockin' good time while I am there. Gotta get my concert T-Shirt!! 

Today I did ANOTHER DIY project. I know, right? Two days in row! 
This was one I had been meaning to do since I got my boots and saw the pin on Pinterest. Yes, my inspiration came from Pinterest. 


Supplies Needed: 
1. One Pool Noodle {purchased for $1.88}
2. Scissors
3. Boots

Directions:
1. Measure pool noodle against boot to see how much you need to cut off. 


2. Cut pool noodle with scissors.


3 Take the piece you just cut off and measure it against the remaining pool noddle for your 2nd length and cut that one off.


4. Place noodles in your boots and voila!


Show your boots who is boss and prevent wrinkles! 


I hope you enjoyed my tutorial! Good luck making your own boot shapers! I am off to bed to get some sleep before the big concert tomorrow!

Goodnight all!

xoxo Miss Maully

Thursday, May 9, 2013

Miss DIY Momma {Laundry Detergent}

Hey lovelies! Guess what I did? 

You guessed it! I FINALLY made my own laundry detergent. 

It's been a long time comin' and I couldn't be more proud! In order to get ready to move I will be painting some furniture, making a coffee table and >> making homemade cleaning supplies, soaps and more. I'm calling these tutorials Miss DIY Momma.


Here is my tutorial for Homemade Laundry Detergent
 {now called the Moore Family Detergent}

Ok so this was SO super easy. It only took me about 20 minutes to complete the whole thing, not including time to gather materials. 


1. Gather materials.
-A 55 oz of Arm & Hammer Washing Soda for $3.24
-A 4 lb 12 oz box of 20 Mule Team Borax for $3.38
-Two 4.5 oz bars of Ivory soap {My mother gave me 2 bars for free}. You can purchase bars in bulk of any bar soap you choose.
-Bucket & measuring cup. {I already had the bucket and measuring cup}. 
-One 1 gallon container. I purchased two 1 gallon containers for $2.97 a piece and didn't need both! So I am going to use the other container for another project. 
-Cheese grater any kind. I purchased a cheese grater for $6.44 that I am going to use for the kitchen after I wash it. {We splurged on the fancy one}


2. Grate 1 bar of soap into a bucket.
 Depending on how big of a batch you are making, the bucket size will differ. This took the longest and made me sneeze really bad. 


3. Measure out 1 cup of Borax and dump into bucket with grated soap.
 Remember: Borax can be harmful if ingested so keep out of reach of the LO's and clean up well afterward. 


4. Measure out 1 cup Washing Soda
 {NOT BAKING SODA} and pour into the bucket with the grated soap and Borax.


5. Dump the grated soap, Borax and Washing Powder from the bucket into the 1 gallon container, screw on lid and SHAKE WELL.
{I felt like a mad scientist doing this and felt like it might explode!}

6. Peel off label and stick on your own!
{I still need to make one}

7. Start using your homemade laundry detergent!
Use 1 Tbsp per load or 2 Tbsp for heavily soiled loads. 

**This is just 1 "serving". You can totally double, triple and even quadruple the amounts to make more! Also, add in an essential oil for amazing fragrance!**

Total Spent: $12.79 {including the cheese grater} {Remember, I already had the bucket, measuring cup and 2 bars of soap. 

<<<I will be using the soap tomorrow and I will let you know how it does!>>>


Have you ever made Homemade Laundry Detergent? How did you like it? What were your results? 
I LOVED making this! I can't wait to make & USE my other cleaners and such. Oh the trials and tribulations of a DIY Addict. 

Tomorrow {well now it is today} I am putting down the deposit on the apartment we want, the one with the laminate hardwood in the kitchen. I was freaking out because I have to wait like a week on Rosie's Birth Certificate and I was afraid that we would loose the apartment we wanted, but that is not the case! We will have our apartment on hold while we wait for her BC to come in the mail. Damn thing cost me $50 so we better get the apartment we want. I keep planning where things will go, how I will decorate, cleaning routines, having my Craft Center set up, my Family Binder on my desk, room for Rosie...is it too early for me to be getting so exited? =)


Love you all! Goodnight and sweet dreams!

xoxo Miss Maully


Saturday, March 23, 2013

Spring Cleaning {Parent's Refrigerator}

Hey I have awesome post for all you lovelies tonight! I had been planning on cleaning out and organizing my parents fridge for awhile, and I finally did it today! 

I have an wonderful tutorial for you below with tips and tricks!

Enjoy your start of Spring Cleaning!

I started about 1 pm this afternoon, after eating lunch and a chocolate bar {don't worry, it was Dark Chocolate, therefore I am being healthy}

This is what it looked like before I took anything out.


I took EVERYTHING out. Mind you, my parents are not so hot with throwing food away and they shove more food than is necessary in their fridge, so I removed A LOT of food. I wish I had a picture of this, but I did not take one. I threw away and poured out all the bad and expired food and then removed all the shelves. 
I put all the shelves and drawers in the bathtub and ran hot water and poured in dish soap, laundry detergent and all-purpose cleaner. All 3 cleaners are Natural & Organic & from Whole Foods. 

I left the bottom shelf in to keep the most perishable items cold while I went to get storage bins from Dollar General. I spent about $40 on several different sized bins, but I will be taking a few back that I didn't use . {I also bought a $3 picture frame for Rosie.} 

This is what happened right after I got back from Dollar General.


In the middle of being cleaned and organized!


When I got back, I washed and rinsed the shelves and left them to dry.

I don't have a picture of all the bins I used, but I only ended up having space for 7 of them, including one to keep lettuce in. 

After I wiped down the interior and door of the fridge, I places the main shelves in and back on the door. Then I took the big shelf to the tub to soak. 
I wiped off all the bottoms of the containers BEFORE putting them back in. I had to play around with the height of the shelves so that I could put the bins in certain spots. 

After retrieving the big shelf, I put away the rest of the food into the drawers, like fruits, veggies and meat. There were a few duplicate sauce containers so I poured them into 1 container. We ended up using a few of the sauce containers that only had a little left in them at dinner. 


When all was said and done, the fridge REEKED with organization and simplicity. There were SO many partial loves of bread that made the bread bin overflowing, but they will use them up now that they know what they have and where it is at. I finished around 6 pm. I worked on this project for 5 hours! But it was totally worth it, to see the fridge in better condition than it's been since they bought it.

Rosetta watching the snow fall.


I did this project for them {mostly my mom} because she suffers from Planter Fasciitis and cannot stand. I did not ask for any payment, only that my mom watch Rosie while I cleaned. Luckily, Rosie basically slept the whole time. I did not let my mom see the fridge until it was all done, because she had been skeptical of my methods. However, she seemed very exited when she saw the finished work. 

I stayed over for dinner. Right before I sat down to eat, I noticed that there were some items out of place in the fridge. I just hope that they keep it clean and organized and don't over stuff it again. It better stay clean or this red head will get mad! 

I guess I will perform organization maintenance checks on it when I visit. So that will be a least once a week.

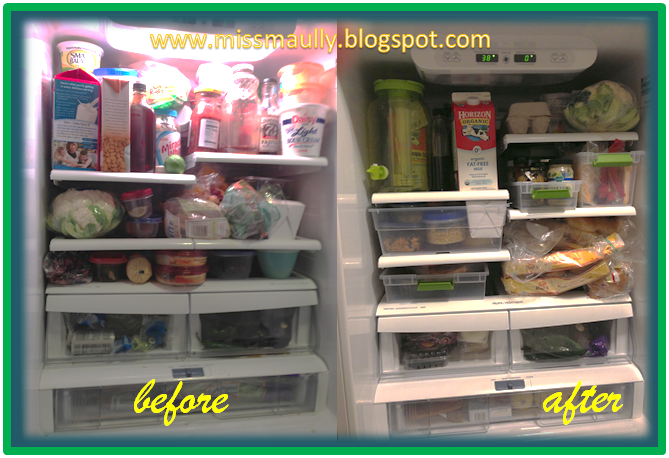
Here is another before & after just for good measure.


and a list of where everything is placed


An early start to Spring Cleaning! What are your Spring Cleaning plans?
I think this is a good start!
Let me know what you think and what your plans are in the comments below!

Have a good night and sweet dreams!
 {I was just thinking about some good dreams I've had before and hope I have some good ones tonight!}


xoxo Miss Maully